Showing posts with label cake. Show all posts

Saturday, 24 January 2009

Barbie Doll Cake

I have baked & decorated a few Doll Cakes before but never had the chance to post for an entry here. Anyhow, on Balqis's 4th birthday last November, I had a camera in hand to snap some shots.

I love to use the Moist Choc Cake recipe as it's so simple & of course, my girls' favourite. For this doll cake, it was my first time using a whole Barbie doll instead of the half body doll meant for doll cakes. I bought myself a Wilton doll cake set which comes with the doll but there was an episode during the elder girls' birthday whereby the doll's hand caught fire from the lit candles.

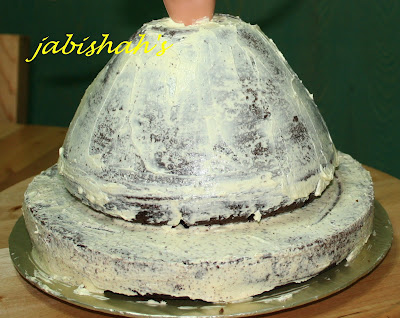
The Wilton doll cake pan is not tall enough for the whole Barbie Doll. I needed to bake another cake for the bottom dress. Or else my doll cake might look funny as the doll & the dress are not proportionate.

The Wilton doll cake pan. Normally I add another half the recipe. You can also use a deep round bake pan.


Round cake pan for the base.


Ice the base.


Next, put the other cake onto the iced base.


Slowly poke in the Barbie Doll.


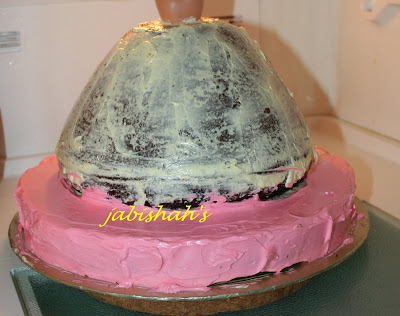
Ice the dress & put in the fridge. After a few minutes when the first layer has harden, ice another layer. The reason for this is to make the icing process easier & almost crumb free.


Ice the base with desired coloured icing & return cake back into the fridge. Continue with the dress.


I used nozzle tip no. 46 for the frills.


Draw ribbons with nozzle tip no. 3


The Barbie Doll cake is almost ready except for the bodice & accessories.


I chose to make the bodice as simple as possible with nozzle tip no. 102.


Use nozzle tip no. 4 for the dots as necklace & hair accessory. Silver edible beads are best as diamonds.


The Barbie Doll Cake


The Barbie with her little princess, the birthday girl.


I just realised that I had never shared my butter icing recipe. Here you go.

Whip together all the ingredients. A block of butter, a tsp of vanilla essence, 3-4 tbs of milk (any will do), icing sugar up to the sweetness you prefer. For this cake I used 3 blocks of butter.


Sunday, 10 August 2008

Moist Chocolate cake

This recipe was given to me by a dear aunt who is my mom's neighbour. It was her who really made me fell in love with baking. She taught me to bake this cake way when I was still a teenager. My mom was working then unlike her, who was by then a retired teacher. Thank you auntie from the bottom of my heart...

I have given this recipe to many of my friends. The reason it is a hit is definitely due to its real simple method to prepare. This is also the very recipe I use with all the birthday cakes that I bake & used to sell.

All the following ingredients are combined orderly into a mixing bowl.


6 1/2 oz wheat flour
2 1/2 oz cocoa powder
2 tsp soda bicarbonate
12 oz sugar (not necessarily fine sugar)
8 oz Ideal Milk (full cream evaporated milk)
8 oz corn oil
6 oz water
2 tsp of nescafe (or coffee) diluted in the water
2 eggs
1 tsp vanilla essence
1 pinch of salt

Mix together


The batter is thinner than the usual cake batter


Transfer the batter to a baking pan & bake for 45 minutes at 180 degree C


The baked chocolate cake


Let the cake cool & once cool place the cake bottom up on a tray


While waiting for the cake to cool, heat a pan & add in cooking chocolate.


Add in about 2-3 tbsp of Ideal Milk & a bit butter to make the topping shine


Stir until all is mixed together & the chocolate melt


Scoop the topping onto the cake


Ice the topping thoroughly all over the cake


The cake complete with chocolate topping


Silver balls as decoration for my HB's 34th birthday

Tuesday, 15 April 2008

Baked New York Cheesecake

Who won't go crazy over cheesecake? I know one person in particular. HB can't take any food that consumes cheese. Even pizza is not his favourite! My partner in crime over cakes is of course Yasmin. Cheesecake... that's the top in our list!

There are various ways to prepare cheesecake. In this entry I chose Baked New York Cheesecake. It is a recipe from a local baking book I own. Give it a try. It won't disappoint you.

First, with a mixer whip 500 grams of cream cheese until smooth.


Add in 125 grams fine sugar & whisk until it gets fluffy.


Now, join in 150ml of double cream into the batter.


Next, put in 4 egg yolks & continue whisking.


Once the batter is fluffy add in lemon rind of a half lemon & 90 grams of sifted, super fine flour. Whip until everything is well mixed & put aside.


In another bowl, whisk the remaining 4 egg whites, 75 grams fine sugar & half a tablespoon of lemon juice. Whisk until stiff.


Add 30 grams of cornflour into the egg whites.


Next combine the batter into the egg whites. Whip until it is mixed together.


Scoop out the batter & put it into a baking pan.


To prevent the cake from cracking, the batter is steam-baked or using the bain marie method. That is the baking pan is put into another baking pan filled with water.


Steam-bake at 150 degree C for 1 1/2 hours.


Put in the fridge for the cake to cool.


Baked New York Cheesecake. Best to be served chilled.


Yasmin at her best trying to tempt with her piece of cheesecake!

Saturday, 23 February 2008

Castle Cake

This is my first attempt making a castle cake. It was more like a request from Wardah. She asked for a castle with a garden. The minute I heard that request, it did give me a jitter. But I took it as a challenge. Browsed the net for ideas & I came out with this castle cake.

I used 3 square shaped cakes. The 1st 2 cakes I baked a day before the icing process. The 3rd cake I baked on the morning of the following day.


I do not own a rectangular baking pan. As to make my cake a rectangle, I cut out an edge of the 1st cake. Next is to cut the 2nd cake to half. Join the 1st & 2nd cake together. Now you have a rectangular shape cake.


Now from the 3rd cake & the leftover cakes cut out 1 big square, 2 smaller squares & 1 tiny cube. Make sure the cube can fit the size of an ice cream cone & also the smaller square can fit the cube in the middle with 4 ice cream cones at each corner.


Now is the fun part... icing the cake. Ice each layer of the cake with icing. I use butter icing. Let cool in the fridge.


Once the butter icing is hard, ice the cake again with your desired colour. The reason for the 1st layer of icing needs to be chilled before the 2nd layer, is to make the icing process easier with crumbs free. I made a mistake for being too eager to ice the cake that I did not wait until the icing properly chilled. As a result, my cake was full with crumbs. Due to our hot weather, it is also recommended to put the cake in the fridge after icing each layer. Start from the top.

Put the cake in the fridge again. Arrange slices of cake in front of the castle. This will be the garden.


Use nozzle tip no.4 to make a line on each layer of the cake & decorate with edible silver balls.


Make a door using the same nozzle & silver balls.


Ice the garden with green icing & use nozzle tip no.233 to make grass.


Pound some Koko Krunch & sprinkle it in front of the main door.


I have prepared the castle towers the day before. This is the step-by-step guide to prepare the towers out of ice cream cone. As the cones were too fragile, I did not poke the paper flags onto the cones. Instead, I glued them using the icing.


My almost complete castle.


Princess Wardah's proud castle